The Bigger Picture

Tying the knot means leaving single-hood and investing your time, effort, future, and money with someone for the rest of your life. It's one heck of a ride and a challenging test of patience, forgiveness, understanding, and faith.

The Bigger Picture

Tying the knot means leaving single-hood and investing your time, effort, future, and money with someone for the rest of your life. It's one heck of a ride and a challenging test of patience, forgiveness, understanding, and faith.

Creativity Defies the Common

Your wedding deserves to mirror your story. It's a celebration of what you and your partner have gone through and will go through.

Creativity Defies the Common

Your wedding deserves to mirror your story. It's a celebration of what you and your partner have gone through and will go through.

Memoirs

Meeting with your closest friends and family members is all about sharing what's special.

Memoirs

Meeting with your closest friends and family members is all about sharing what's special.

A Vow of Forever

Let us start with forever, Love.

A Vow of Forever

Let us start with forever, Love.

Showing posts with label 365 DIY challenge. Show all posts

Friday, February 17, 2012

Days 27-33: DIY Hair Do

A great peso-saving quirky idea is to know exactly what you want to look like on your wedding day. To be fair, a lot of Western brides who opt for rustic barn weddings make it a point to have their "do" and make-up made by themselves. 


Yes, in my vain effort to look for great ideas to shorten our expenses for our allotted budget, I've stumbled upon this great blog from a lady named Cinthia Truong. She has a fantastic sense of hair styling that the fashion goner in me felt hope will spark once I try and follow her lead. And so I did. Of course, my attempt to doing her "do" was a major fail but I'm not giving up on doing it allover again.


Thus, a week of hair styling for my 365 DIY challenge begun!

Day 27: Hair with a Twist. This style is perfect for that clean and chic cocktail look. Twisting the hair in this manner is super easy and unique. Goodbye common curls, hello twisted hair!


Day 28: Princess Wedding Do. Want to look like a Renaissance woman or a Medieval princess? Go ahead and try this braiding technique and hair puffing! This one is great for that elegant youthful look a bride hopes for on her wedding day.


Day 29: Bohemian Do. I, personally, am a huge fan of curls; however, I would want mine to be spiced up and not look that familiar. This tutorial seemed to be perfect for my penchant. The romantic bohemian braids prepared in this vid is really easy to follow. I'm yet to perfect the "do," though. *wink* 


Day 30: Romantic Curly Bow. This will have to be my favorite style among the bunch. For one, it really looks sophisticated. Likewise, it looks lovely and unique!


Day 31: Quick and Easy Bun. A bride-on-the-go might want to have a quick and easy wraparound technique to utilize in styling her hair. This "do" is simple, yet it looks a tad bit complicated. 


Day 32: Prom Bride. For those who want a fresh-looking "up-do," this tutorial is nothing but perfection. The braiding technique is really simple that this "do" is also great for the prom night look. 


Day 33: Cute Top Hat Do. For those creative brides out there, try this mini top hat do with your very offbeat attire. Lovely! 


Source: Cinthia Truong
Posted on 2/17/12 at 6:00 PM

Thursday, February 9, 2012

Days 24-26: Cheap Invi Ideas

Doing your own invitation is probably a very good budget-wise decision for everyone whose into cutting their wedding expenses. For one, wedding invites can be crafted accordingly. Also, there are tons and tons of available sources one can find online and off-shelves.

Here are some nifty ideas I grabbed online! Credits are not mine by the way.

Day 24: Lady Bug Invi Idea
This is a very helpful guide for couples who wish to incorporate the "love bug" theme in their wedding. Likewise, this is perfect for those who have red and black as their motif. I kind of like the idea of using this one; however, we're on the black and yello shades and I doubt that a black and yellow lady bug would look nice (though there really are black and yellow lady bugs)!

Day 25: The Petal Card
For brides and grooms that are having a floral-themed wedding, this tutorial I've nabbed online is one great treat! It basically provides a step-by-step guide as to how to create a petal card. Very easy to follow yet oozing with creativity!

Day 26: Pocketfold Envelops
Using pocketfold envelops has never been outdated. Couples may use these over and over again without hurting much of their financial pie. It's really simple and can be a great DIY bonding activity for soon-to-be husbands and wives.
Posted on 2/10/12 at 7:00 AM

Tuesday, February 7, 2012

Days 21-23: Origami Art to Fancy Any Wedding

Francis and I are so decided in having a DIY-ed wedding. Though he doesn't really say much when it comes to the venue selection, he always manages to put his insight on the table. It's rather odd that we haven't torn our heads off at this point in time with our usual indecisiveness and differences.i

We can (in fact) go on and on regarding how ravishing some DIY projects are. For once, I want to incorporate a very unique guestbook idea and perfect the art of fabric and paper flower making. On top of this, we've really wanted our wedding to center on our love story and creativity. Thus, paper cranes came to my mind!

Paper cranes are very hopefulfilling for many Asians. They say that if you religiously fold 1000 paper cranes, then your true heart's desires will become a reality. Sounds snazzy, right? Well, this seems to be a very interesting adornment in the reception (and probably a sound theme to implore in our celebration).

Cool Crane! Too bad the photo and this aren't mine.


In lieu of this, I've selected three origami art as DIY crafts for couples:

Day 21: Easy-to-Follow Tutorial for the Paper Cranes

Day 22: Paper can be roses too.
Day 23: Making paper butterflies is qiute relaxing.
Life, I mean, I  better start looking for more tutorials before it's too late. Gaahhh!!! Wedding gaga over DIY projects!
Posted on 2/07/2012 at 3:00AM

Saturday, February 4, 2012

Days 17-20: DIY STD and Fashion

Work has been crazy for the past weeks. I've gathered some videos in my browser's bookmark page for me to check from time to time. Here are four quick tutorials on several DIY wedding projects.


DIY Save-the-Date Magnets

DIY Wedding Earrings 

DIY Garters

DIY Save-the-Date Cards 


*** These videos are taken from YouTube. I do not own them. Credits to the posters.
Posted on 2/4/2012 at 6:23 PM

Tuesday, January 31, 2012

Days 14-16: Bouquet 101

One post, three different crafts, one must: flowers.


The bridal march will be nothing but complete with that perfect bouquet. I've dubbed myself to be a broke-ass bride-to-be and being one entails having a keen eye on where we'll put our money. To cut our expenses, we've agreed to plunge into the DIY wedding escapades everyone seems to have been raving about in the recent years. 


Our main idea of what our celebration would be is a warm party. Having every detail DIY-ed will seem to be challenging, but I must say that it's pretty much what we wish for. DIY essentials involve creativity and thriftstore sojourning.


My bouquet will surely place itself in our DIY catalog, which we'll start crafting this coming April. Hurray!!! *smiles widely* For now, I'll be concentrated on looking for affordable bouquet ideas. Like these three I've grabbed online!


A beautiful mesh of fresh flowers and handcrafted ones. Can you guess which is which?


How To:
1: Collect supplies. Use fresh flowers, handmade velvet flowers, berry twigs, feather birds, feathers and vintage brooches. A family heirloom ribbon (vintage tatting) and velvet ribbon can be used to personalize the bouquet!
2: Start from the center. Gather the fresh flowers altogether in the center and build the floral base of your bouquet. Work your way out by adding more and more flowers. This time around, surround the base with crafted flora.
3: Tape them. You will need to hold the stems together, so gently wrap the stems with floral tape. Make sure that not a single stem is let loose. 
4: Adorn. Use what creative heirloom pieces you have or crafted materials are there present! You'll be using feather birds and wires to have them wrapped accordingly. This fun part will all depend on your peg for your bouquet.
5: Use a trusty ribbon. Wrap the base of your stems with a pretty ribbon. Be creative and use other materials!
Courtesy of The Broke-ass Bride


Love is indeed in the air for this couple. I've fallen in love with this craft tutorial. I might make my own bouquet like this one! LOVE IT :)


How To:
1: Trace the hearts in your felt fabric. Using your cookie cutter or heart template trace out your heart shapes onto your felt.  We used a heart cookie cutter that’s about 3 inches tall.
2: Cut out your hearts. Do this carefully to ensure that the shape of the heart will not be jagged or difficult to re-shape.
3: Sew. Using your embroidery thread and a needle start stitching your hearts.  Make sure that the sides you traced on are now facing inwards so that you don’t have any pen/pencil marks on the outsides of your hearts.
4: Leave some space. Stitch the entire way around your heart, leaving about 3/4 of an inch near the pointed end of your heart.
5: Fatten it up. Gently stuff your heart with a small amount of batting.
6: Sew the stem. Take your clothe wire stem and make a tiny loop at the end. Place the looped end inside the heart and begin sewing up the last remainder of your heart while you wrap neatly around the stem as well.  The looped wire end will prevent your stem from coming out of the heart.  {{Note: If you don’t want long stems you may be able to cut your stems in half thus doubling your stem.  THERE! Your heart-on-a-stick is done! Make as many as you’d like depending on what sized bouquet you’d like}}
7: Tape the stemsOnce you’ve created all your heart-on-a-sticks you can start arranging them in a bouquet.  If you’re on your own, use some floral tape to help secure the placement of each heart.
8: Ribbon time. Once you’re happy with your arrangement, you can add your ribbon.  Using a glue gun (sparingly) being wrapping your ribbon around your stem.  Use whatever width and texture of ribbon you’d like!

Courtesy of Labelle Bride


Burlap bouquet wonder. Perfect for that rustic vintage wedding theme! Oh! DIY magic! Oh that magic!


How To:
1: Cut. Cut a strip of burlap about 2 inches thick and a foot long (depending how big you’d like your flowers).
2: Paste. Take your stem and glue the tip of it onto the very end of your strip.
3-4: Roll. Begin to roll your stem into the burlap, gluing along the way. Continue rolling your stem about 4-5 times. This creates the center “bud” of you flower.
5-6: Petal folding. Now it’s time to start your petals! Take the fabric strip that is dangling from your “bud” and make a fold away from you, holding the bottom of the folding piece close to the stem. Overlapping your first “petal” slightly, create another backwards fold or petal. Again, holding the bottom of the fold near the stem.
7: Paste. Glue your first two petals in place. Try to put the glue closer to the base of your flower.
8: Repeat. Continue steps 5-7 until you’ve completed an entire row of petals all the way around.
9: Tighten it. Poke your glue gun in here and there to secure the flower
10: Base foundation. With your remaining fabric you’ll now secure the base of your flower and the top of your stem by winding the fabric around, gluing when appropriate.
11: Tada. Voilà! Your little burlap flower!
12: Adorn. Now personally I like these flowers just on their own, but if you’d like to add a little color to your bud you can add a small piece of ribbon and a pearl pin in the center. If you’re making a bouquet like in the first photo, assemble a few burlap flowers, trim the ends and wrap with ribbon. It’s THAT easy.
Courtesy of Labelle Bride

Such amazing finds, right?


Sources: The Broke-ass BrideLabelle BrideLabelle Bride (again)
Posted on 1/31/12 at 1:10 PM

Saturday, January 28, 2012

Day 13: Memoir-filled Guestbook (Check!)

Going over Internet articles and how-to instructions has been my recent addiction. I can't help raving about these fantastic DIY projects. For instance, I've been lurking in forums finding cheap options to cut our wedding budget. With just 100,000 PHP in our plate, Francis and I know that it'll be one heck of a trip to the thrift shop.


The guestbook is not as salient as other weddings musts (i.e. wedding gown, rings, reception, church, and food). This, however, doesn't mean that we'll take this piece for granted. Your attendees may have pretty much to say to you, and what better way to have them voice their opinion than to allow them to sign your guestbook. 


Mind you, there are thousands of "craftastic" ideas out there in the open (waiting for you to discover). Take for example this amazing scrapbook idea, which I may implore as our guestbook inspiration.


The scrapbook

Materials
3 sheets solid cardstock 8-1/2" square
2 pieces patterned paper 5-1/2" square
2 pieces chipboard or cardboard 4-1/2" square
Four different coordinating papers cut to a little less than 4-1/4" square. You will need a total of 10 squares to cover the inside squares of the book.
Ribbon, 1 yard
Embellishments and photos of your choice.

OR
3 sheets solid cardstock 12" square
2 pieces patterned paper 8-1/2" square
2 pieces chipboard or cardboard 6-1/2" square
Four different coordinating papers cut to a little less than 6-1/2" square. You will need a total of 10 squares to cover the inside squares of the book.
Ribbon, 1 yard
Embellishments and photos of your choice

Steps
1. 
Folding: Take the paper and fold in half lengthwise in one direction and repeat it in the other direction. Make sure that you'll be forming a cross by meeting the center. Try folding the paper (from lengthwise) to form a mountain. Do not repeat the step as you should only create one diagonal fold. Do the folding to the other sheets of paper.


2. Overlapping: Put the far right square of one piece atop the middle sheet of paper, and then link the middle sheet to the last piece. Glue the pieces tightly. Note that you have to turn the pieces of paper to produce that diamond shape before putting the paper together.

3. GluingUsing a hot glue gun, glue the 5-1/2" (or 8-1/2" if doing the bigger book) square pieces of patterned paper to the chipboard. Cut the corners diagonally and fold over edges. Glue these down and you get a nice professional finish. Glue one onto the front of your book. For the back of your book take your other piece of covered chipboard and place it upside down. Glue ribbon to it centered, and then glue ribbon side to back of book.

4. Decorating: Embellish the cardboards with whichever design you choose to!


Source: Making Mini Scrapbooks
Posted on 1/28/12 at 6:43 AM

Friday, January 27, 2012

Day 12: Tissue Paper Carnations (Check!)

As a DIY queen wannabe, I've particularly decided to replace fresh flowers with tissue paper versions. For one, these beauties can last and I can re-use them as decorations for our future love nest. Likewise, my friends and I can all participate in the preparation.


I'm not really a demanding kind of friend; however, weddings just bring out the hidden "you." By spending time with them making crafts, I can further our friendship and help them have peso-saving ideas for their own wedding in the future!


Here's a simple DIY project involving carnations. Photos and idea courtesy of Folding Trees:
The project. Tada!


Materials:
Tissue paper
Scissors
2 large paper clips
Pipe cleaners (chenille stems) or floral wire
Coloured marker pen
Optional: floral wire, floral tape, wire cutters

Please visit Folding Trees for the step-by-step guides.


Source: Folding Trees
Posted on 1/27/12 at 6:43 AM

Thursday, January 26, 2012

Day 11: Table Numbers

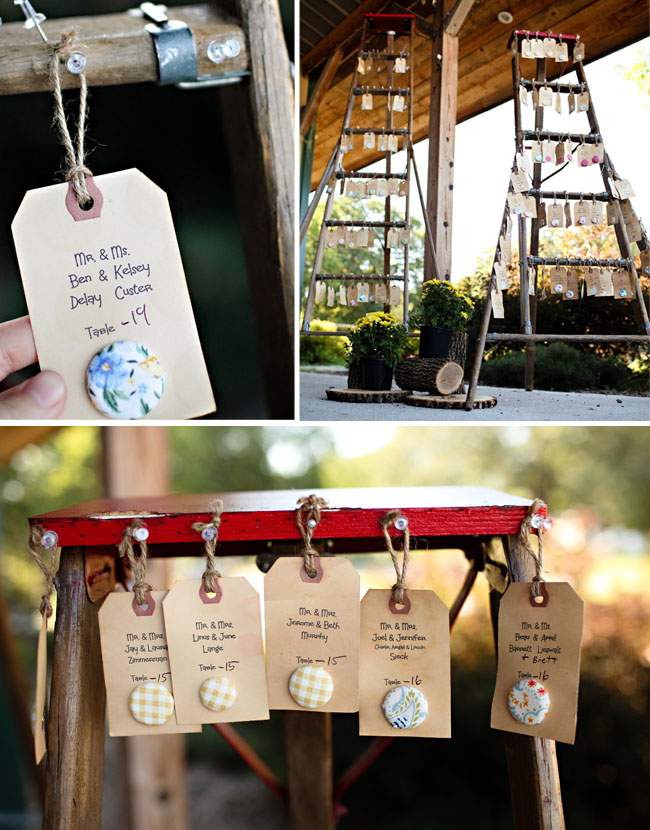
Table numbers, along with other paper craft ideas, pretty much enlighten every wedding party. With a touch of creativity, you can turn that dull numerals into a set of chic and cozy paperwork. Here's one good deal of tutorial I grabbed online.
Chic and comfy


Materials:
Color printer
Card stock in color of your choice, 8.5" by 11"
Paper cutter or scissors
Gold acrylic craft paint
Fine paintbrush


Steps:
1. Table number templates 1-20 are available as .pdfs to download and print.
2. Print table numbers onto card stock and cut out along provided lines.
3. You can use the table numbers as is or add extra metallic details with gold craft paint and a fine brush. Use the paint to detail the floral border. Be sure to keep the brush relatively dry, especially if you've print your cards on an inkjet printer.


Oweee! I can't wait to try this. I'm just wondering if I'll forgo numbers and go with attributes or keywords instead.


Source: Project Wedding
Posted on 1/26/12 at 6:43 AM

Wednesday, January 25, 2012

Day 10: Vintage Jars Centerpiece

We know that going for a vintage-themed wedding is costly. But we're not giving up on this idea yet. Ours won't be a fancy vintage celebration. Rather, it will be warm, cozy, and modest. The idea of incorporating rustic vintage elements is to provide an artsy and elegant look to the entire function.


Putting together recycled materials can be a good peso-saving solution. For one, we will try including mason jars in our centerpiece arrangement.
Our peg for the centerpiece (BridalBuzz)


This just looks lovely, doesn't it? Well, preparing it is not taxing. All you need to do is to keep the jars clean and color them accordingly. 


Materials
mason jars, Viltrea 160 (glass coloring), thinner, oven, fan brush


Steps
1. Put some drops of the glass coloring and mix well in a plastic tupperware. 
2. User your brush to to mix the solution further and color the jar.
3. Make sure you color both the interior and exterior of it.
4. Turn the jar upside down and let it set for 24 hours.
5. Bake in the oven at 375 degrees for a little less than 40 minutes.
6. Adorn the jar with flowers. Don't worry about the uneven texture of the used coloring.


See? It doesn't take a scientist to do this nippy arrangement! Try it yourself.


Source: BridalBuzz
Posted on 1/25/12 at 6:43 AM

Tuesday, January 24, 2012

Day 9: Creative Paper Flower Tutorial (vid)


I've started  scouting easy-to-execute craft ideas via Youtube to select efficient guidelines we will use for our own wedding party. To date, I've spent nine days of research. 


The tutorial I've selected is actually very interesting. It's one you can use to adorn your invites. The Youtube user has posted her take on making paper flowers.


Materials 
* Paper of different texture and design
* Paint
* Sponge
* Glue
* Special puncher


*** Source: Christina1716


Posted on 1/24/12 at 9:57 PM

Monday, January 23, 2012

Day 8: Paper Roses as Bouquet (Check!)

I am a budget-conscious wife-to-be not only because of the limited resources we have at the moment, but also since Francis and I are both reluctant to splurge on our wedding party. It is a once in a lifetime event, yes. That's the exact point! You'll only be celebrating it once! 


More things will come after the wedding. You will be having a family and that means providing for your soon-to-bear kids. Researching for affordable wedding details options is very enlightening. I am not as positive that we will not go beyond our set budget. Still, we'll try not to no matter what!


One website has given a step-by-step guide on making a peper bouquet. Yes, people! I am considering of crafting my bouquet from fabric or paper (or probably both), whichever spins my imagination.


The finished product: the Paper Roses


Why
Scanty reasons are there as to why you ought to have the flowers (among other ornaments DIY-ed). Here is a summary of my hubris:


1. Practicality. You'll only use these flowers once in your life and saving on them will allow you to add funds to your emergency budget.
2. Creativity. Being a hands-on bride is all about having a ton of "me" time and enjoying things you normally don't do in ordinary days. Say, for example, making paper crafts.
3. Discovery. Other than the creation time being your time alone from work among other stressors, it's a good bonding time to spend with your partner. Doing mini projects will allow your groom to see through the process and appreciate every detail of it.


Materials
6"styrofoam ball, scissors, wood skewers, light weight colored paper, yarn, masking tape 


You can actually use a mix of plain paper, metallic paper and a very light textured paper. It's a nice idea so as to give texture and body to the crafted paper flowers you are to make.


Carnations
1. Roll up a small piece of paper and attach with tape to the top of the skewer, this is to keep the petals from just falling off. I did this with the rosettes too.
2.Cut between 4-8 circles, depending on how big you want the flower, and poke a small hole in the middle
3.Starting with the first piece of paper, scrunch it up, no need to be neat with it! And continue with all the pieces of paper. Add a little piece of tape on the bottom to keep them from sliding out too.


Steps 1-3
Rosettes
1.Cut a spiral out of a piece of paper, about 4x4 inches
2.Roll all the way down, slightly pinching just to make it tight
3.Slide a skewer through the top and add a piece of tape underneath

Steps 1-3

After completing the crafted paper flowers, proceed with sticking the pieces together in your selected ball of Styrofoam. cover the surface with whichever pattern you opt. You can make your ball of flowers even better by adding fabric crafts.
Our wedding's motif is yellow and black with white and gray accent. We'll have to make these shades work with the right elements for my bouquet. Pretty giddy right now!


*** Craft idea and pictures courtesy of Project Wedding.


Posted on 1/23/12 at 9:56 PM

Sunday, January 22, 2012

Day 7: Going Gaga Over Tissue Pomanders

I stumbled upon a wedding DIY site that is just ravishing! Project Wedding is just a haven of various DIY projects. For my 365 DIY project challenge, I've chosen this project involving tissue pomanders as these are just simply beautiful.
The finished product
Materials
1. Styrofoam Balls: Sold at craft stores such as Michaels.  For this guide, Marina used 3” balls.
2. Tissue Paper: For each pomander, you’ll need approximately 72 sheets of tissue paper cut to be 5” x 7”
3. Scissors
4. Wire: Sold at hardware stores
5. Wire Cutters: Sold at hardware stores


Methods
Step 1: Cut each sheet of tissue paper to 5” x 7”.
Using the available tissue material you have, cut the sheet of paper with the measure 5" x 7". No need to keep the cut well-aligned. You may produce jagged sides and edges but it will still be fine.

Step 2: Stack 4 sheets of tissue and fan fold all the way up.
Fan-folding is a method wherein to fold the paper in creases with alternating format. Do this accordingly and try to keep the creases aligned this time.

Step 3: Tie some wire around the middle of the tissue. 
There's no strict length as to how long the excess wire ought to be or how many recoiling needs to be done. You just have to secure the tissue paper by wrapping the wire and leave an extra tail to have something to stick in the Styrofoam. Fab, right?

Step 4: Start pulling the tissue sheets up one at a time. Left then Right.  
Do this step all over again until to get your preferred "fluffiness." Remember not to pull too strongly because it might ruin the tissue and tear the piece into a multitude of others.

Step 5: Stick the wires into the Styrofoam ball.
Continue this process until the ball is fully covered with the pieces of wrapped tissue paper. What is wonderful about this project is that you control the effect of the pomanders by fluffing it up should you wish to do so.
If Francis and I are to incorporate these babies in our adornment project, we'll have to look for the right shade of yellow. I feel like I'm dreaming of soft tissue paper right now. *tee hee* 
*** Craft idea and pictures courtesy of Project Wedding.
Posted on 1/22/12 at 9:55 PM

Sunday, January 15, 2012

Day 6: Candle Floaters on Soaked Water

I've been a fan of Freshhomeideas (and I have my loyalty with them). This doesn't limit my voyage, though, to seek weird and fancy craft ideas for my and Francis' BIG DAY. While "googling," I've stumbled upon an entry on candle floaters.


Floaters. Oooowweee.


These are just lovely "craftastic" decors for your tables. Wedding or no wedding, the floaters look amazing! Just imagine these beauties at the table's center.


Things You Need
3 cylindrical vases (preferably of different sizes)
3 candles (make sure that they fit perfectly in each vase)
Faux helicona blossom (as advised by the tutorial) - You may use other materials that suit you. IMHO, using any plastic flower will still push forward the look you're going after.


Easy as 1,2,3
1. Gather the materials. Make sure that the vases are well-kept and clean.
2. Put the stemmed flower inside each vase. Arrange it as per your preference.
3. Fill the vase with water.
4. Put the candle atop the vase.


Viola! Now, you have pretty floaters to boast about.


Sources:
www.save-on-crafts.com

Posted on 1/15/12 at 5:42 PM

Thursday, January 12, 2012

Day 5: Tiny Flowers

I am so in love with Freshhomeideas. It's a haven of great DYI projects that are easy to make. Probably by February I'll be posting my takes on these goodies. For now, I'll just be posting this great find. Trust me, they'll look lovely in any garden wedding affair.


Pink has never been my color but these are just lovely. I can't stop raving about these flora.

Step 1: Gather Vases
Find clear glass-footed containers. Using containers of various heights will add depth and interest to your display.


Step 2: Add Double-Sided Tape
Apply double-sided transparent tape around the top of a clear glass footed container.


Step 3: Tie Ribbon Over Tape
Wrap grosgrain or sheer ribbon over the tape. If using grosgrain ribbon, allow the ends of the ribbon to just meet and press against the tape to secure. If using sheer ribbon, press the ribbon against the tape to secure, and then tie the ends in a knot, allowing streamers of the ribbon to trail onto the table.


Step 4: Add Flowers
Fill the containers with water. Snip the stems from flowers and place them in the container.


Step 5: Add Tea Light Candles
Place a tea light candle in the center of some of the flowers if desired.


Sources:
www.freshhomeideas.com

Posted on 1/12/12 at 5:36 PM

Wednesday, January 11, 2012

Day 4: Flowers with Moss Centerpiece

I must admit that I really am not a fan of expenditures that don't generate any valuable return. I may not be a businessman, but gambling (in whichever form) is just not my thing. Hence, when I chanced upon this entry in Freshhomeideas, I just couldn't wrap my finger on it.


The craft itself is simple; yet, it resonates a very clean and rustic look--suitable for our supposed take on a vintage, rustic wedding.


Gleeful, right?


This craft project isn't that bad to work around. Note, though, that if we are to implore this in our adornments, we'll have to figure out which flowers to use. Since we are pinning on the Black and Yellow motif, I guess it's only proper to have yellow hues all over the tables. Hmmm. Maybe tulips and sunflower? Maybe have them DIY-ed too? Gah! The thought of creating these babies is driving me loonie.


Before I spill more craze-filled lamentations, please follow through the following steps:


Step 1: Gather Vessels
Search out straight-sided glass vases in assorted shapes and sizes.


Step 2: Wrap Vases with Moss
Wrap double-sided tape around the middle of each vase. Cut a band of sheet or reindeer moss to fit around each vase and place over the tape.


Step 3: Wrap with Natural Raffia
Wrap natural raffia around the center of the moss; tie ends in a knot or small bow. Fill the vases with water.


Step 4: Add Flowers
Because the height of centerpieces is not a concern on buffet tables, we chose to fill the moss-covered vessels with long-stemmed runnuculus.


Source:
www.freshhomeideas.com

Posted on 1/11/12 at 5:34 PM

Related Posts Plugin for WordPress, Blogger...